3-PACK ADAPTER INSTALL INSTRUCTIONS
HOW TO INSTALL AXLE PACK
Axle Pack is designed to mount to our Thru Axle Fit Kits. If you do not have one of our thru axle fit kits you can find the right one for your bike using this Fit Kit Finder.
BENÖTIGTES WERKZEUG:
- 3mm Inbuss
- 4mm Inbuss
- 6mm Hex
- Drehmomentschlüssel
- Zange oder Dritthand-Werkzeug
- Seitenschneider oder Nagelknipser
- Anti-seize (empfohlen) oder Fett
Vergiss nicht alle Schrauben mit Anti-seize (empfohlen) oder Fett vorzubereiten. This will prevent the bolts from, you guessed it, seizing and making it hard to remove the bolts down the road.
SCHRITT 1: INSTALL THE FIT KIT THRU AXLE
- Entferne die vorhandenen Steckachse deines Fahrrads.
Richte deine Steckachse so aus, dass sie mit deiner serienmäßigen Steckachse übereinstimmt:
- Vergleiche deine serienmäßige Steckachse mit der Robert Axle Project Steckachse, die in deinem Fit Kit enthalten ist, um zu überprüfen, ob sie übereinstimmen. Die Gewindesteigung der Achsen sollte identisch sein (Bild J) und die Gewindelänge sollte innerhalb von +/- 2 mm liegen. Verwenden Sie bei Bedarf die beiliegenden Distanzscheiben, um die Länge und den Konus Ihrer Serienachse anzupassen. Siehe Bild K.
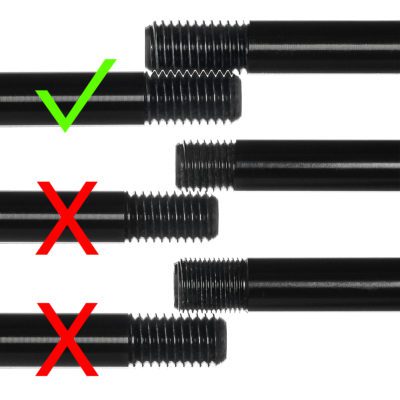
Bild J
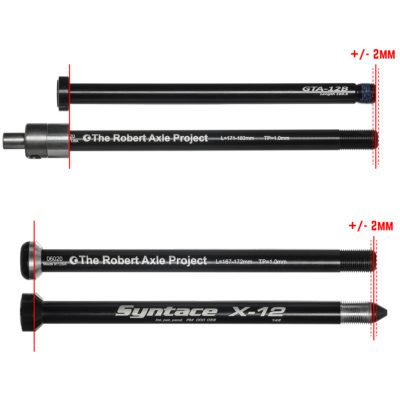
Bild K
- Now that you’ve confirmed you have the correct axle; mitpply grease to the shaft and threads of the Robert Axle and insert into your bike. For front axles use a 6mm hex key and torque to 10nm.
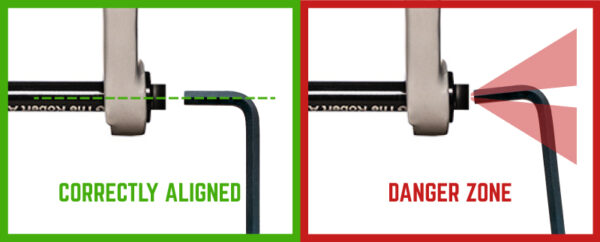
FRIENDLY REMINDER: Be sure to always keep your hex tools aligned with the hex broach. Inserting and torquing tools at an angle can damage tools and parts.
SCHRITT 2: ATTACH AXLE PACK TO THE AXLE
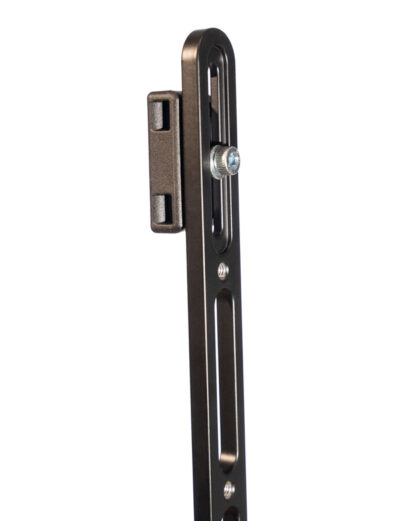
- Take a look at Axle Pack and you’ll notice that the foot at the bottom is offset. This ensures compatibility with a much wider range of forks. The “Standard” installation is with the foot facing forward and the Old Man Mountain logo facing backwards. If your fork get’s in the way in this position you can flip it to have the foot facing backwards.

- Attach your Axle Pack to the axle with the 20mm hex bolts from Hardware Kit 4. Don’t forget to apply anti-seize (preferred) or grease to all bolts.
- Don’t worry about torquing the bolts down now as we will do that at the end after installing the Mounting Puck.
SCHRITT 3: ATTACH MOUNTING PUCKS
If your fork has upper eyelets that line up, you can use them to attach the top of the Axle Pack. If your fork does not have upper eyelets use the Pucks provided with your Fit Kit.
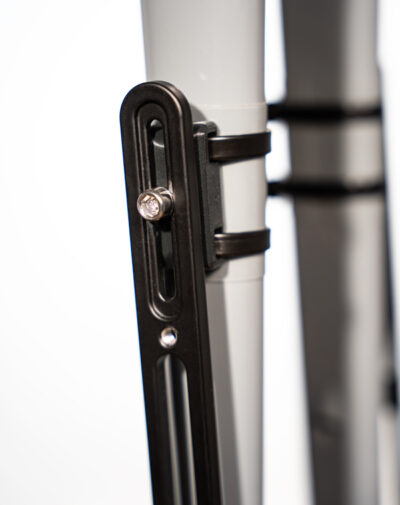
- Bolt the Mounting Puck to your Axle Pack at or near center of the top slot of the Axle Pack using Hardware Kit #6 or #7, depending on which came with your Fit Kit.
- We recommend mounting the puck as high as possible.
- Puck A will use the 10mm spacer between the Axle Pack and the Puck.
- If Puck B or C seems too far away from your fork you may need to use the included 10mm spacer between the Axle Pack and the Puck.
- With the Puck attached to the Axle Pack you can rotate it in line with your fork to see where it will attach, and where to install the clear protective tape.
- Before peeling the backing off the protective tape. Wrap it around your fork to measure how much to cut off so it does not overlap itself. Cut to that length and install the protective tape.
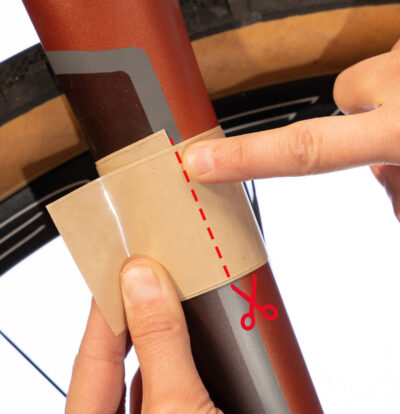
HINWEIS: Schneide das Klebeband so zu, dass es sich nicht überlappt.
- Get the Pucks and our supplied ZipTies ready to install. We make the following 3 styles:
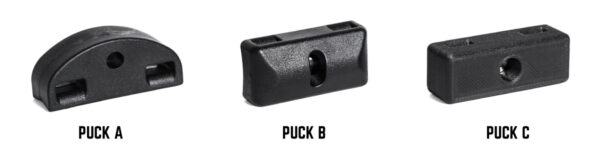 – PUCK A should be installed with the hex nut slot facing your wheel.
– PUCK B needs to have the threaded barrel inserted into the Puck before attaching it to the fork. The chamfer on the threaded barrel should face the fork.
– PUCK C should be installed with the brass insert against the fork. - Install the Pucks using our special ZipTies. Pull ZipTies tight with a pair of pilers. Do not cut yet. Be sure to use the supplied ZipTies, they are far stronger than standard ZipTies and are UV stable, and do not ratchet so they can snug up as tightly as possible.
PRO TIP: Putting the ZipTies, head down in a cup of hot water will soften them and help them install even easier.
SCHRITT 4: ENDKONTROLLE UND NACHZIEHEN
Ziehe alle Teile gemäß den folgenden Spezifikationen fest.
- Puck B = 6 Nm
- Puck A and C = 3 Nm
- Bolts attaching Axle Pack to the axle = 3nm
- Give the zip ties one more pull with a pair of pliers, then cut flush. (Nail clippers work well for a very flush cut).
Always double check all hardware and parts before each ride!
GLÜCKWUNSCH!
DU BIST STARTKLAR


FEHLERBEHEBUNG
Fällt dein Fahrrad aus der Norm und hast du Probleme bei der Montage? Keine Sorge! Unsere Gepäckträger sind unglaublich anpassungsfähig und wir haben jede Menge Tricks in petto, wenn es darum geht, unsere Racks an alle möglichen Fahrräder zu montieren.
Bei allen Fragen schreib uns gerne auf: [email protected]. Wir haben mit Sicherheit eine passende Lösung für dein Fahrrad und stehen gerne zur Hilfe bereit.