BIKE RACK INSTALL INSTRUCTIONS
HOW TO INSTALL A PIZZA RACK
This rack is eyelet-mount ready out of the box. If your bike does not have upper and lower eyelets, we produce a full-line of Fit Kits for thru axles or QR skewers.
TOOLS NEEDED:
- 4mm hex
- Torque wrench
- 10mm box wrench
- Anti-seize (preferred) or grease
If installing one of our Fit Kits that uses pucks, you will also need:
- pliers or third hand tool
- cable cutters or nail clippers
- 5mm hex (for rear Fit Kit)
- 6mm hex (for front Fit Kits)
Don’t forget to apply anti-seize (preferred) or grease to all bolts. This will prevent the bolts from, you guessed it, seizing and making it hard to remove the bolts down the road. Don’t worry, we use Nyloc nuts where needed to prevent bolts from loosening on their own.
STEP 1: ASSEMBLE THE RACK
- While the uprights of the Pizza Rack look identical they are left and right specific. Look at the top of the upright tube and you’ll see a vent hole on one side of the tube. These vent holes face inward with the flat part of the upright facing the back of the deck.

Notice how the upright has the vent hole facing inward and the flat part of the upright facing the back of the deck.

- Use Hardware Kit 8 to attach the uprights to the inside of the threaded barrels on the deck.
NOTE: The bolts come with Loctite 242 already applied. If installing the bolts for a second time you will need to reapply Loctite 242 or grease.
STEP 2: ATTACH THE RACK TO YOUR BIKE
Now select how you will attach the rack to your bike.
Place the provided 19mm spacer from Hardware Kit 10 (or C) between the uprights’ mounting holes and your frame or fork eyelets. THESE SPACERS ARE REQUIRED FOR EYELET MOUNTING. They protect your frame and strengthen the connection between the bolt and rack.
19mm Spacer Placement for Eyelet Installation
- Attach the rack to your frame or fork eyelets using the bolts in Hardware Kit 10 (or C). Don’t forget to apply anti-seize (preferred) or grease to all bolts.
NOTE: If your bike does not have lower eyelets, we offer Fit Kits to mount your rack via thru axle or quick release.
ANOTHER NOTE: The bolts come with Loctite 242 already applied. If installing the bolts for a second time you will need to reapply Loctite 242 or grease.
- Remove your bike’s stock thru axle.
Setup your thru axle to match your stock thru axle: - Compare your stock thru axle to the Robert Axle Project thru axle provided in your Fit Kit to verify they match. The axles’ thread pitch should match (Image J) and the shaft length should be within +/- 2 mm. Use enclosed spacers as needed to match the length and taper of your stock axle. See Image K.
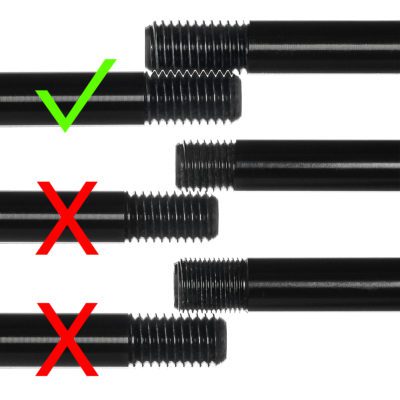
Image J
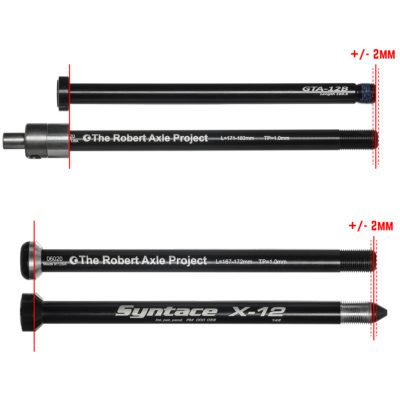
Image K
- Apply grease to the shaft and threads of the Robert Axle and insert into your bike. For front axles use a 6mm hex key and torque to 10nm.
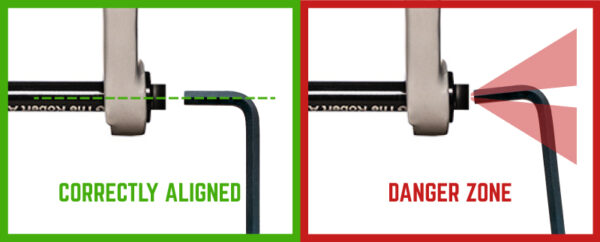
FRIENDLY REMINDER: Be sure to always keep your hex tools aligned with the hex broach. Inserting and torquing tools at an angle can damage tools and parts.
- Attach your rack to the axle. The side of the axle with the hex will use a 30mm bolt and lock washer from Hardware Kit 10 (or C). The other side will use a 20mm bolt and lock washer from Hardware Kit 4. The slots on the uprights should face the center of the bike. Don’t forget to apply anti-seize (preferred) or grease to all bolts.
NOTE: The bolts come with Loctite 242 already applied. If installing the bolts for a second time you will need to reapply Loctite 242 or grease.
- Remove your stock skewer from your bike, keeping your wheel in place.
- Place your OMM rack on your bike and install the OMM QR Skewer through the rack Dropouts and your hub.The slots on the uprights should face the center of the bike. Don’t forget to apply anti-seize (preferred) or grease to all bolts.
- Check that your bike and rack are level, and snug up the QR.
STEP 3: ATTACH THE EXTENDERS
Now select how you will attach the extenders to your bike.
- Attach the Extenders to the upper eyelets on your bike’s fork using the two M5 x 12mm bolts included with Hardware Kit 10. On some bikes, bending the Extenders is necessary to properly line up the extenders with the eyelets and/or the inside of the rack’s crossbars. Don’t forget to apply anti-seize (preferred) or grease to all bolts.
PRO TIP: If bending the Extenders, we like to wrap them in a paper towel to protect the finish, and bend them in a vise to get nice, clean bends.
- Use Hardware Kit 2 to attach the slotted end of the Extenders to the inside of the crossbars on the uprights. Snug them up, but do not torque them yet. Don’t forget to apply anti-seize (preferred) or grease to all bolts.
Note: Uprights should only be attached to the slots on the uprights and not to the eyelets.
- Check again to make sure rack is level and adjust the extenders as necessary.
- Locate where you want to install the Pucks onto your fork, and install the clear protective tape to those areas. The top of the pucks should be aligned with the rim or above.
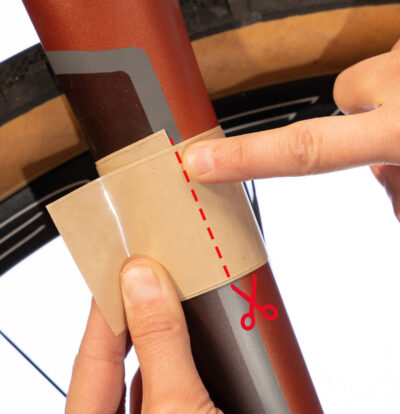
NOTE: You will want to trim the tape so that it will not overlap BEFORE sticking it to your bike.
- Get the Pucks and our supplied ZipTies ready to install. We make the following 3 styles:
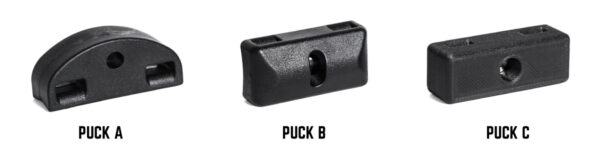
– PUCK A should be installed with the hex nut slot facing your wheel.
– PUCK B needs to have the threaded barrel inserted into the Puck before attaching it to the fork. The chamfer on the threaded barrel should face the fork.
– PUCK C should be installed with the brass insert against the fork. - Install the Pucks using our special ZipTies. Pull ZipTies tight with a pair of pilers. Do not cut yet. Be sure to use the supplied ZipTies, they are far stronger than standard ZipTies, are UV stable, and do not ratchet so they can snug up as tightly as possible.
PRO TIP: Putting the ZipTies, head down in a cup of hot water will soften them and help them install even easier.
- Attach the Extenders to the pucks with Hardware Kit 6. On some bikes, bending the Extenders is necessary to properly line up the extenders with the eyelets and/or the inside of the rack’s crossbars.
PRO TIP: If bending the Extenders, we like to wrap them in a paper towel to protect the finish, and bend them in a vise to get nice, clean bends.
- Use Hardware Kit 2 to attach the slotted end of the Extenders to the inside of the crossbars on the rack frame. Snug them up, but do not torque them yet. Don’t forget to apply anti-seize (preferred) or grease to all bolts.
- Check again to make sure rack is level and adjust the extenders as necessary.
STEP 4: FINAL CHECK AND HARDWARE TIGHTENING
Tighten up all the hardware to the following specifications.
- M5 bolts (Eyelets) = 3 Nm
- M6 bolts (Deck and Extenders) = 6 Nm
- If you used Pucks, give the zip ties one more pull with a pair of pliers, then cut flush. (Nail clippers work well for a very flush cut).
We use Nyloc hardware where possible to ensure your rack stays securely and reliably attached to your bike on even the most rugged conditions but you should always double check all hardware and parts before each ride!
CONGRATS!
YOU’RE READY TO RIDE

TROUBLESHOOTING
Is your bike an independent thinker, unwilling to conform to bike industry norms? No problem! Our racks are incredibly adaptable and we have lots of tricks up our sleeve for strange bike fits.
For any fitment issues email us via [email protected]. We almost certainly have a solution to fit your bike and are quick to reply, If you want to get a step ahead send us a few pictures of your bike or any challenges you’ve encountered.